Hey all, this is part 2 of setting up an CentOS server. For backup and accessibility, I always set up a Samba share. Samba is a filesharing protocol supported by Microsoft Windows, Linux and MacOS and I therefor prefer this type of fileshare over others in terms of compatibility. If you want to see other parts of this series:
Samba can be challenging to set up because of the complexity and the amount of configuration options, however, for the purpose of a homeserver, we’ll keep it simple. We’ll associate the rights of the share with a local linux user account on the target machine and we’ll share the /opt/* folders to allow us to remotely access configuration files of the docker containers that we’ll be setting up in a future tutorial.
Installation
To start with Samba, we first have to install it:
sudo yum install samba samba-client samba-common
Let’s start samba and let it run by default:
sudo systemctl start smb
sudo systemctl start nmb
sudo systemctl enable smb
sudo systemctl enable nmb
Preparing the firewall and the share
Then, before proceeding with the configuration of Samba, let’s first prepare the machine in terms of firewall and SELinux:
sudo firewall-cmd --permanent --zone=public --add-service=samba
sudo firewall-cmd --reload
Create the directory which will be shared:
sudo mkdir -p /opt/Docker
The directory will now be owned by root, however, I want this to be owned by my user, which i called linux earlier. When checking the permissions, this will be the result:
[linux@localhost ~]$ ls -l /opt
total 0
drwxr-xr-x. 2 root root 6 Dec 29 10:57 Docker
Now, let’s change some options:
sudo chmod -R 0750 /opt/Docker
sudo chown -R linux:linux /opt/Docker
chcon -t samba_share_t /opt/Docker
In the first line, the permissions on the folder are adjusted to allow the logged in user to read and adjust the files, but not for anonymous users. This is recursive for all folder below. Then, the folder’s owner is changed to the user linux and group linux, and finally, SELinux is setup to allow folder access. Otherwise Samba won’t work properly. SELinux is typical for RedHat distributions, such as CentOS. This command is not applicable to Debian distros.
Samba security
Also, even though this is optional, it’s strongly recommended to secure the server by using a smbgroup and authenticate the user. The configuration of Samba below assumes you’ll complete the following steps as well.
sudo smbpasswd -a linux
You are then prompted to fill in a password which is used for samba access:
[linux@localhost ~]$ sudo smbpasswd -a linux
New SMB password:
Retype new SMB password:
Added user linux.
Samba Config
Now we can get on with Samba configuration.
sudo vi /etc/samba/smb.conf
This already contains a config in some cases. You can choose to back it up, or to overwrite it. Backing up would work like this:
sudo cp /etc/samba/smb.conf /etc/samba/smb.conf.old
Then, the following code can be inserted into the file:
# See smb.conf.example for a more detailed config file or
# read the smb.conf manpage.
# Run 'testparm' to verify the config is correct after
# you modified it.

[global]
        netbios name = <COMPUTER NAME>
        server string = <COMPUTER NAME>
        workgroup = <WORKGROUP>
        hosts allow =
        remote announce =
        remote browse sync =
        security = user
        dns proxy = no

        passdb backend = tdbsam

        printing = cups
        printcap name = cups
        load printers = yes
        cups options = raw


#===================== SHARES ======================

[Docker]
        path = /opt/Docker
        browsable = yes
        read only = no
        valid users = @linux
        writable = yes
        guest ok = no

[homes]
        comment = Home Directories
        valid users = %S, %D%w%S
        browseable = No
        read only = No
        inherit acls = Yes

[printers]
        comment = All Printers
        path = /var/tmp
        printable = Yes
        create mask = 0600
        browseable = No

[print$]
        comment = Printer Drivers
        path = /var/lib/samba/drivers
        write list = root
        create mask = 0664
        directory mask = 0775
In this case, you need to fill in the computername on the top as it would appear to other computers in the network. Under the [Docker] share, make sure you fill in your local user under valid users =.
Test the validity of the configuration:
testparm
Restart Samba:
sudo systemctl restart smb
sudo systemctl restart nmb
Now you’ll be able to connect to the share on other computers, in Windows by pressing Windows Flag + R and typing \\.
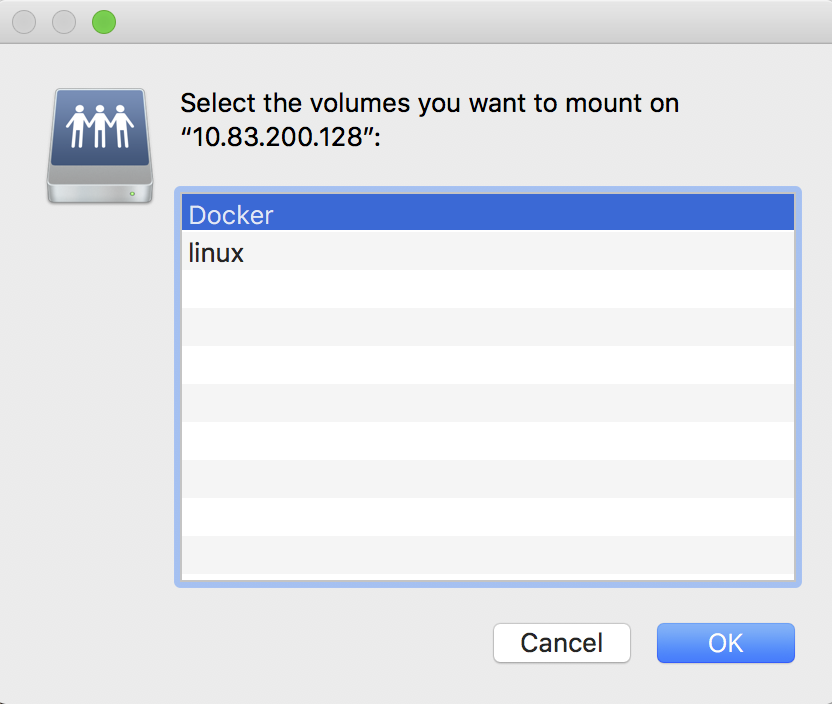
On MacOS, in Finder go to the taskbar Go > Connect to server..
Fill in the server IP address:

Click connect and then login with the credentials created in this tutorial in the security section. Then all available shares are visible: